【Laravel + MySQL】簡単な認証処理を作る
前回作成したLaravelアプリケーションに認証処理を実装します。
データベースの作成
ユーザーテーブル作成
Laravel 6.2 にはセットアップした段階で以下の migration 用のコードが入っていますのでこれを実行します。(※今回使用するのはusersテーブルだけです。)
- 2014_10_12_000000_create_users_table.php
- 2014_10_12_100000_create_password_resets_table.php
- 2019_08_19_000000_create_failed_jobs_table.php
$ php artisan migrate
Migration table created successfully.
Migrating: 2014_10_12_000000_create_users_table
Migrated:  2014_10_12_000000_create_users_table (0.41 seconds)
Migrating: 2014_10_12_100000_create_password_resets_table
Migrated:  2014_10_12_100000_create_password_resets_table (0.43 seconds)
Migrating: 2019_08_19_000000_create_failed_jobs_table
Migrated:  2019_08_19_000000_create_failed_jobs_table (0.31 seconds)
※migrationでエラーになるという場合は 【Laravel + Docker】migration で could not find driver が出たときの対応 が参考になるかもしれません。
ユーザーデータの登録
次にseedという機能を使ってデータを登録します。これはテストデータやマスターデータなど、開発するにあたって必要なデータを登録する機能です。
database/seeds/DatabaseSeeder.php
DatabaseSeeder クラスは最初からあるコードで、このrunメソッドに記載されている seed が実行されます。
<?php

use Illuminate\Database\Seeder;

class DatabaseSeeder extends Seeder
{
    /**
     * Seed the application's database.
     *
     * @return void
     */
    public function run()
    {
        $this->call(UsersTableSeeder::class);
    }
}
database/seeds/UsersTableSeeder.php
次にデータを登録する部分は {テーブル名}Seeder クラスになり、こちらは投入するデータに合わせて作成します。
<?php
use Illuminate\Database\Seeder;
use Illuminate\Support\Facades\DB;
use Illuminate\Support\Facades\Hash;
class UsersTableSeeder extends Seeder
{
    /**
     * Run the database seeds.
     *
     * @return void
     */
    public function run()
    {
        DB::table('users')->truncate();
        $users = [
            [
                'name'     => 'テスト',
                'email'    => 'test@test.com',
                'password' => Hash::make('password'),
            ],
        ];
        foreach($users as $user) {
            App\User::query()->create($user);
        }
    }
}
Seederの実行と確認
作成したSeederクラスの実行は以下コマンドで実行します。(--classオプションは任意で、省略した場合DatabaseSeederのrunメソッドに登録されたSeederがすべて実行されます。)
php artisan db:seed --class=UsersTableSeeder
$ php artisan db:seed --class=UsersTableSeeder
Database seeding completed successfully.

$ docker exec -it laravel-project_mysql_1 bash
root@29a71082b88d:/# mysql -u user -p
Enter password:
Welcome to the MySQL monitor.  Commands end with ; or \g.
(省略)
mysql> use test
Reading table information for completion of table and column names
You can turn off this feature to get a quicker startup with -A

Database changed
mysql> desc users;
+-------------------+---------------------+------+-----+---------+----------------+
| Field             | Type                | Null | Key | Default | Extra          |
+-------------------+---------------------+------+-----+---------+----------------+
| id                | bigint(20) unsigned | NO   | PRI | NULL    | auto_increment |
| name              | varchar(255)        | NO   |     | NULL    |                |
| email             | varchar(255)        | NO   | UNI | NULL    |                |
| email_verified_at | timestamp           | YES  |     | NULL    |                |
| password          | varchar(255)        | NO   |     | NULL    |                |
| remember_token    | varchar(100)        | YES  |     | NULL    |                |
| created_at        | timestamp           | YES  |     | NULL    |                |
| updated_at        | timestamp           | YES  |     | NULL    |                |
+-------------------+---------------------+------+-----+---------+----------------+
8 rows in set (0.00 sec)

mysql> select id, name, email from users;
+----+-----------+---------------+
| id | name      | email         |
+----+-----------+---------------+
|  1 | テスト    | test@test.com |
+----+-----------+---------------+
1 row in set (0.00 sec)
認証処理の実装
次の手順で実装していきます。
- Loginコントローラ
- Login画面のView
- ホーム画面用のIndexコントローラ
- ホーム画面のView
- routingの修正
Loginコントローラ
コントローラもLaravelのコマンドによって雛形を作れるので以下コマンドでLoginControllerを作成します。
$ php artisan make:controller LoginController
Controller created successfully.
app/Http/Controllers/LoginController.php
作成されたLoginControllerを開き以下のようにindexメソッドとauthenticateメソッドを追加します。
<?php

namespace App\Http\Controllers;

use Illuminate\Http\Request;
use Illuminate\Support\Facades\Auth;

class LoginController extends Controller
{
    public function index(Request $request)
    {
        return view('login');
    }

    /**
     * 認証処理
     *
     * @param  \Illuminate\Http\Request $request
     *
     * @return Response
     */
    public function authenticate(Request $request)
    {
        $credentials = $request->only('email', 'password');

        if (Auth::attempt($credentials)) {
            return redirect()->intended('/');
        } else {
            return view('login');
        }
    }
}
ざっくり説明するとindexはログイン画面を表示するアクションで、authenticateは認証チェックを行います。
Login画面のView
resources/views/login.blade.php
簡単なログインフォームを用意します。
<!DOCTYPE html>
<html lang="{{ str_replace('_', '-', app()->getLocale()) }}">
    <head>
        <meta charset="utf-8">
        <meta name="viewport" content="width=device-width, initial-scale=1">
        <title>Login</title>
    </head>
    <body>
        <p>Login</p>
        <form action="/login/authenticate" method="post">
            @csrf
            <input type="text" name="email" /><br>
            <input type="password" name="password" /><br>
            <input type="submit" value="submit" />
        </form>
    </body>
</html>
ホーム画面用のIndexコントローラ
Loginコントローラと同じように以下コマンドでIndexControllerを作成します。
$ php artisan make:controller IndexController
Controller created successfully.
app/Http/Controllers/IndexController.php
作成されたIndexControllerを開き以下のようにindexメソッドとauthenticateメソッドを追加します。
<?php

namespace App\Http\Controllers;

use Illuminate\Http\Request;
use Illuminate\Support\Facades\Auth;
use Illuminate\Support\Facades\Route;

class IndexController extends Controller
{
    public function __construct()
    {
        $this->middleware('auth');
    }

    public function index(Request $request)
    {
        return view('index');
    }
}
__constructにより読み込まれているmiddlewareのauthは認証チェックをしていて、未認証でこのコントローラが呼ばれたときにlogin画面へ飛ばす役割をしています。
ホーム画面のView
resources/views/index.blade.php
ホーム画面のViewを何でもいいので用意します。
<!DOCTYPE html>
<html lang="{{ str_replace('_', '-', app()->getLocale()) }}">
    <head>
        <meta charset="utf-8">
        <meta name="viewport" content="width=device-width, initial-scale=1">
        <title>HOME</title>
    </head>
    <body>
        <p>HOME</p>
    </body>
</html>
routingの修正
routes/web.php
web.phpに以下のようにアクション単位で設定すれば、とりあえずはログイン処理が完成です。
<?php
/*
|--------------------------------------------------------------------------
| Web Routes
|--------------------------------------------------------------------------
|
| Here is where you can register web routes for your application. These
| routes are loaded by the RouteServiceProvider within a group which
| contains the "web" middleware group. Now create something great!
|
*/

Route::get('/login', 'LoginController@index')->name('login');
Route::post('/login/authenticate', 'LoginController@authenticate');
Route::get('/', 'IndexController@index');
動作確認
ログイン画面を開く
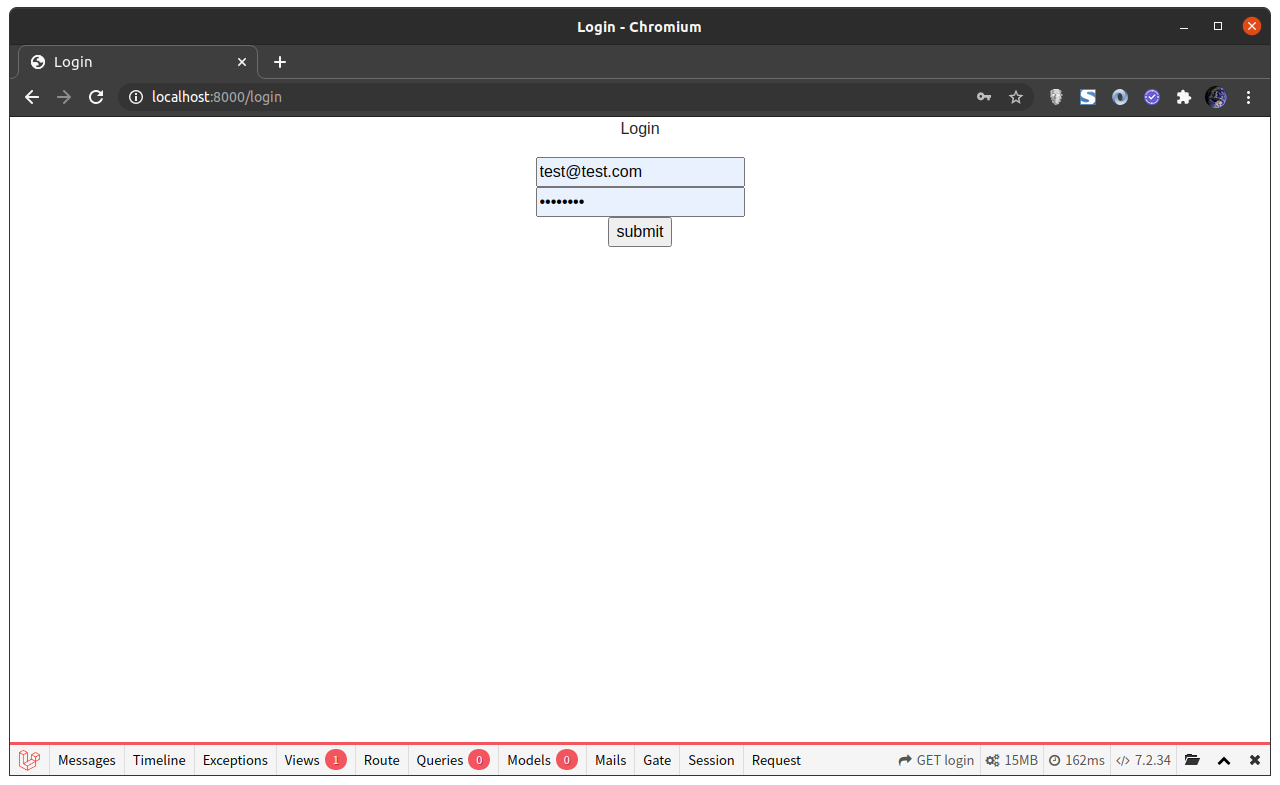
E-mailとパスワードを入力してログインする

コメント
コメントを投稿