【Android】Dialog(画面)をスライドして表示する
Androidアプリケーションで画面をスライドして表示させる方法のまとめです。
アニメーション定義
まずはスライドアニメーションを定義します。
resディレクトリ配下にanimディレクトリを作成し、以下ファイルを用意します。
res/anim/slide_in.xml
<?xml version="1.0" encoding="utf-8"?>
<translate
    xmlns:android="http://schemas.android.com/apk/res/android"
    android:duration="500"
    android:fillAfter="false"
    android:fromXDelta="100%"
    android:fromYDelta="0"
    android:toXDelta="0"
    android:toYDelta="0" />
res/anim/slide_out.xml
<?xml version="1.0" encoding="utf-8"?>
<translate
    xmlns:android="http://schemas.android.com/apk/res/android"
    android:duration="500"
    android:fillAfter="false"
    android:fromXDelta="0"
    android:fromYDelta="0"
    android:toXDelta="100%"
    android:toYDelta="0" />
durationでスライドの速さを調整します。
スライドインするときはX座標が100%の位置(fromXDelta)から開始し、最終的に0の位置(toXDelta)までスライドします。
逆にスライドアウトするときはX座標が0の位置(fromXDelta)から開始し、最終的に100%の位置(toXDelta)で見えなくします。
レイアウト定義
メインレイアウトにはスライド表示させるためのボタン(id:button)を用意します。
LinearLayoutで定義したパネル(id:panel)を、スライドにより表示させるので、visibiliry:goneにして非表示にしておきます。
パネルの中にもボタンスライドアウトさせるボタン(id:close)を用意しておきます。
res/layout/activity_main.xml
<?xml version="1.0" encoding="utf-8"?>
<androidx.constraintlayout.widget.ConstraintLayout xmlns:android="http://schemas.android.com/apk/res/android"
xmlns:app="http://schemas.android.com/apk/res-auto"
xmlns:tools="http://schemas.android.com/tools"
android:layout_width="match_parent"
android:layout_height="match_parent"
tools:context=".MainActivity">
<LinearLayout
android:orientation="vertical"
android:gravity="center_vertical|center_horizontal"
android:layout_width="match_parent"
android:layout_height="match_parent">
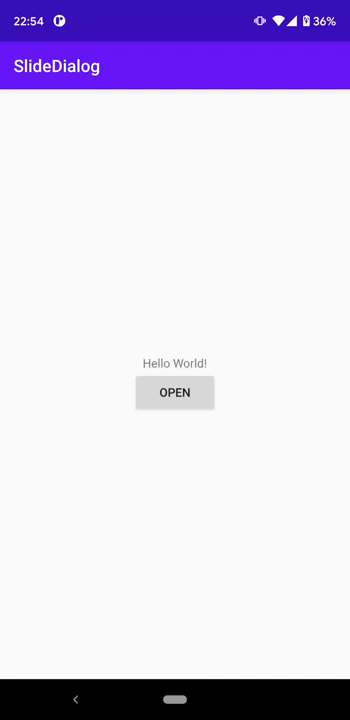
<TextView
android:layout_width="wrap_content"
android:layout_height="wrap_content"
android:text="Hello World!"
app:layout_constraintBottom_toBottomOf="parent"
app:layout_constraintLeft_toLeftOf="parent"
app:layout_constraintRight_toRightOf="parent"
app:layout_constraintTop_toTopOf="parent" />
<Button
android:id="@+id/button"
android:text="OPEN"
android:layout_width="100dp"
android:layout_height="50dp"
app:layout_constraintBottom_toBottomOf="parent"
app:layout_constraintLeft_toLeftOf="parent"
app:layout_constraintRight_toRightOf="parent"
app:layout_constraintTop_toTopOf="parent" />
</LinearLayout>
<LinearLayout
android:id="@+id/panel"
android:visibility="gone"
android:background="@drawable/panel_view_frame"
android:layout_margin="10dp"
android:orientation="vertical"
android:layout_width="match_parent"
android:layout_height="match_parent">
<TextView
android:text="TEST"
android:textSize="18dp"
android:layout_margin="20dp"
android:layout_width="match_parent"
android:layout_height="wrap_content"/>
<Button
android:id="@+id/close"
android:text="CLOSE"
android:layout_width="100dp"
android:layout_height="50dp" />
</LinearLayout>
</androidx.constraintlayout.widget.ConstraintLayout>
実装
メンバー変数
Animation animationSlideIn;
Animation animationSlideOut;
LinearLayout panel;
アニメーションの読み込みと実行
animationSlideIn = AnimationUtils.loadAnimation(getApplicationContext(), R.anim.slide_in);
animationSlideOut = AnimationUtils.loadAnimation(getApplicationContext(), R.anim.slide_out);

findViewById(R.id.button).setOnClickListener(new View.OnClickListener() {
    @Override
    public void onClick(View v) {
        panel.startAnimation(animationSlideIn);
        panel.setVisibility(View.VISIBLE);
    }
});

findViewById(R.id.close).setOnClickListener(new View.OnClickListener() {
    @Override
    public void onClick(View v) {
        panel.startAnimation(animationSlideOut);
        panel.setVisibility(View.GONE);
    }
});
はじめにメンバー変数にアニメーションファイルをそれぞれロードしておき、ボタン押下でstartAnimationメソッドを呼びます。アニメーションの実行後はvisibiliryのフラグを切り替えてあげる必要があります。
画面が重なったときの注意点
この方法でスライドインさせてメインの画面と、スライドさせた画面が重なったとき、スライドさせた画面のタッチイベントを無効にしてやる必要があります。これをしないと手前の画面を操作しているのに後ろの画面が反応してしまい操作性に問題が出ます。以下を入れておけばOKです。
panel.setOnTouchListener(new View.OnTouchListener() {
    @Override
    public boolean onTouch(View v, MotionEvent event) {
        return true;
    }
});
動作確認
コメント
コメントを投稿